Monday, July 25, 2016

Brake canister

Today I changed a brake canister. I have changed them many times before but today things didn't go too smoothly. Leanred a lot tho. 

Here is the old brake canister it was leaking air but the spring was not broken. 
I took the top line off first from the valve. So I could just swivel the bottom line off. 
Then later I forgot to take a picture of the new brake canister because I got really busy. I installed the new canister really easy. I use a breaker bar to hold the canister in place with my thigh then put the ring on and bolt it in place but I don't tighten it down all the way. After the can is in place I hammer around aka clocking the canister then tighten the clamps down. 

But what I did not notice til later was that the emergency line was rubbing against the frame of the truck. So six hours later I brought the truck back to the shop and attempted to turn the canister by just unscrewed the bolts a little bit. Because I was just turning the canister a little bit I didn't apply the brakes and back off the slacks. That was a bad idea as I lossend the bolts a little bit the spring pushed the canister and my hand was in front. It shoot away and my hand didn't stand a chance it got all swollen and hurts a lot. Lesson learned, no matter how much of a hurry you are in don't take short cuts. The truck had to go to work at 4 and when i brought the truck into the shop it was 3:45, I didn't think it through and thought I could get away by just lossing the bolts. Not a good idea. It could have been a lot worse could have been my head or face instead of my hand. Got lucky. And boss wasn't around hahaha. All in all a good week leanred a lot saftey first. 

Hours 171


Monday, July 18, 2016

Starter

This week I changed a starter for the first time. I expected it to be hard. Really wasn't. Just nuts and bolts. But I found it challenging to unscrew the hiden bolt. I couldn't see it and it was in a tight spot. But I leanred to use extensions and laying the new starter down to get an idea of where the bolt is. Here is a picture 

The starter is hard to see you can tell it's a little tough trying to squeeze tools down there. 


Before I started I disconnected the battery's. You can disconnect either the ground or power line. I disconnected the ground. In the far back you can see the starter as well. 

I leanred to use a jack to lift and lower the starter because it is heavy. I also learned how to find the hidden bolt by placing the replacement part and getting an idea of where the bolt may be. 


Hours 126 


Wednesday, July 13, 2016

Radiator

This week I changed a radiator in an international eagle. I brought the truck in for an inspection and noticed it was dripping coolant. With further investigation I came to the conclusion that the radiator needed to be replaced. I tested this by washing down the engine from where it was leaking from and examining it later. I let the truck run at 1400 rpms for 4 hours. Here are some pictures of how I went about it. 


Draining all the coolant. 


Disconnecting hoes, clamps, air to air.

Removing the tank and cover over the fan and radiator frame. 


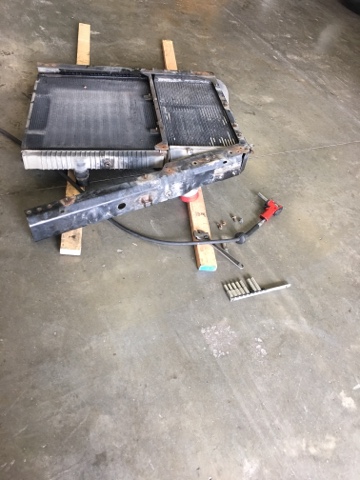
As you can see I did not disassemble all parts I layed the ac and the other part on the grill and windshield.


Then I took out the grill so I could work where the grill is. And as you can see I placed the hood on the barrel so dismounting everything would be easier with the air gun. 


This picture I took to remind me self that there are clamps in the spot. I used all these pictures to help reassemble everything. I use that a lot because my memory is very bad. 

 
And in the picture my co worker helped me take out the radiator with the frame and air to air in it. I shemmed the radiator out of the front of the truck and he raised it with the forklift. 


Desasembling the frame of a the radiator


I used soapy water and shop air to see where the radiator was leaking from. On the left corner you can see the bubbles. 


The new radiator. 


The new radiator in the truck. 

Finished. 

What I leanred:

I leanred the names of parts that I did not know the names of before.

All the parts connected to the radiator and the function. 

How to put together the radiator in the frame. Methods to make my life easy using hammers and chisels.

Testing the "broken" part that it truly is broken.

Time management. 

Organization 

Labeling all bolts so I know where they came from with a paint pen.

These are some of the things I leanred. For me this was a huge learning experience especially because I had no help except to do the test that the radiator truly is bad and to take out and put the radiator frame back into the engine compartment. 


Monday, July 11, 2016

Air lines

This week I did a variety of different things. For example....

Replaced these valves on a tractor. There was a major air leak. We knew the air leak was in that area and my boss did not want to take the time to find the exact problem so we replaced both valves because they were getting old anyways. The quick release valve on the left was the problem it had worn out. I leanred how to trace down air leaks with soupy water and closing the shop doors and muting distractions around me to find the exact spot the air is leaking from.


 I also replaced a radiator for a driver that works for the company I work for. It took about 4 hours pretty easy. I was assuming it would be hard and time consuming. But what I leanred is very important. I leanred that after adding coolant to run the engine on level ground and re check the level of the coolant. After restarting the engine the radiator needed a gallon of coolant. 


I also installed the air lines for the new drop axle we installed on a chassi. I ran the red, blue, and black lines through the trailer, zip tied all the lines in place and hooked them up with fittings. I leanred how to run lines on a trailer and a greater understanding of how the air system works.

Hours 81 


Tuesday, July 5, 2016

Brakes

I do a lot of brakes and services. Here are some pictures of me doing brakes.


In this picture I took off the tires and you can see the drum and brakes. Also for saftey reasons I used jack stands. Some people only use a jack in the middle. 


As you can see these brakes are pretty shot. Past the marking that indicates that the brake needs to be changed. 


The brakes and drum is removed and I cleaned the s cam and studs with a wire brush and brake cleaner. 


Clean 


In this picture the new brakes are on. I could not take picture to show how I put them on due to time so I just took a quick picture showing they are on. I also replaced the drum. These brakes are extended life. To finish it off I put a little bit of oil on the lug nuts and put the tires back on then adjusted the brakes. I replaced all four back axle brakes on this truck. 

I leanred how to change brakes couple months ago. I leanred how to inspect the drum, s cam, slacks, hub, rollers, etc. And how to remove and replace the brake shoes. I always leanred easy ways that I use every day to take less time. 


Hours: 50